Thursday, September 8, 2011

I Don't Believe it!

Evee's "cozy" blanket


Griffons manly Dino Crown


A custom owl taggie


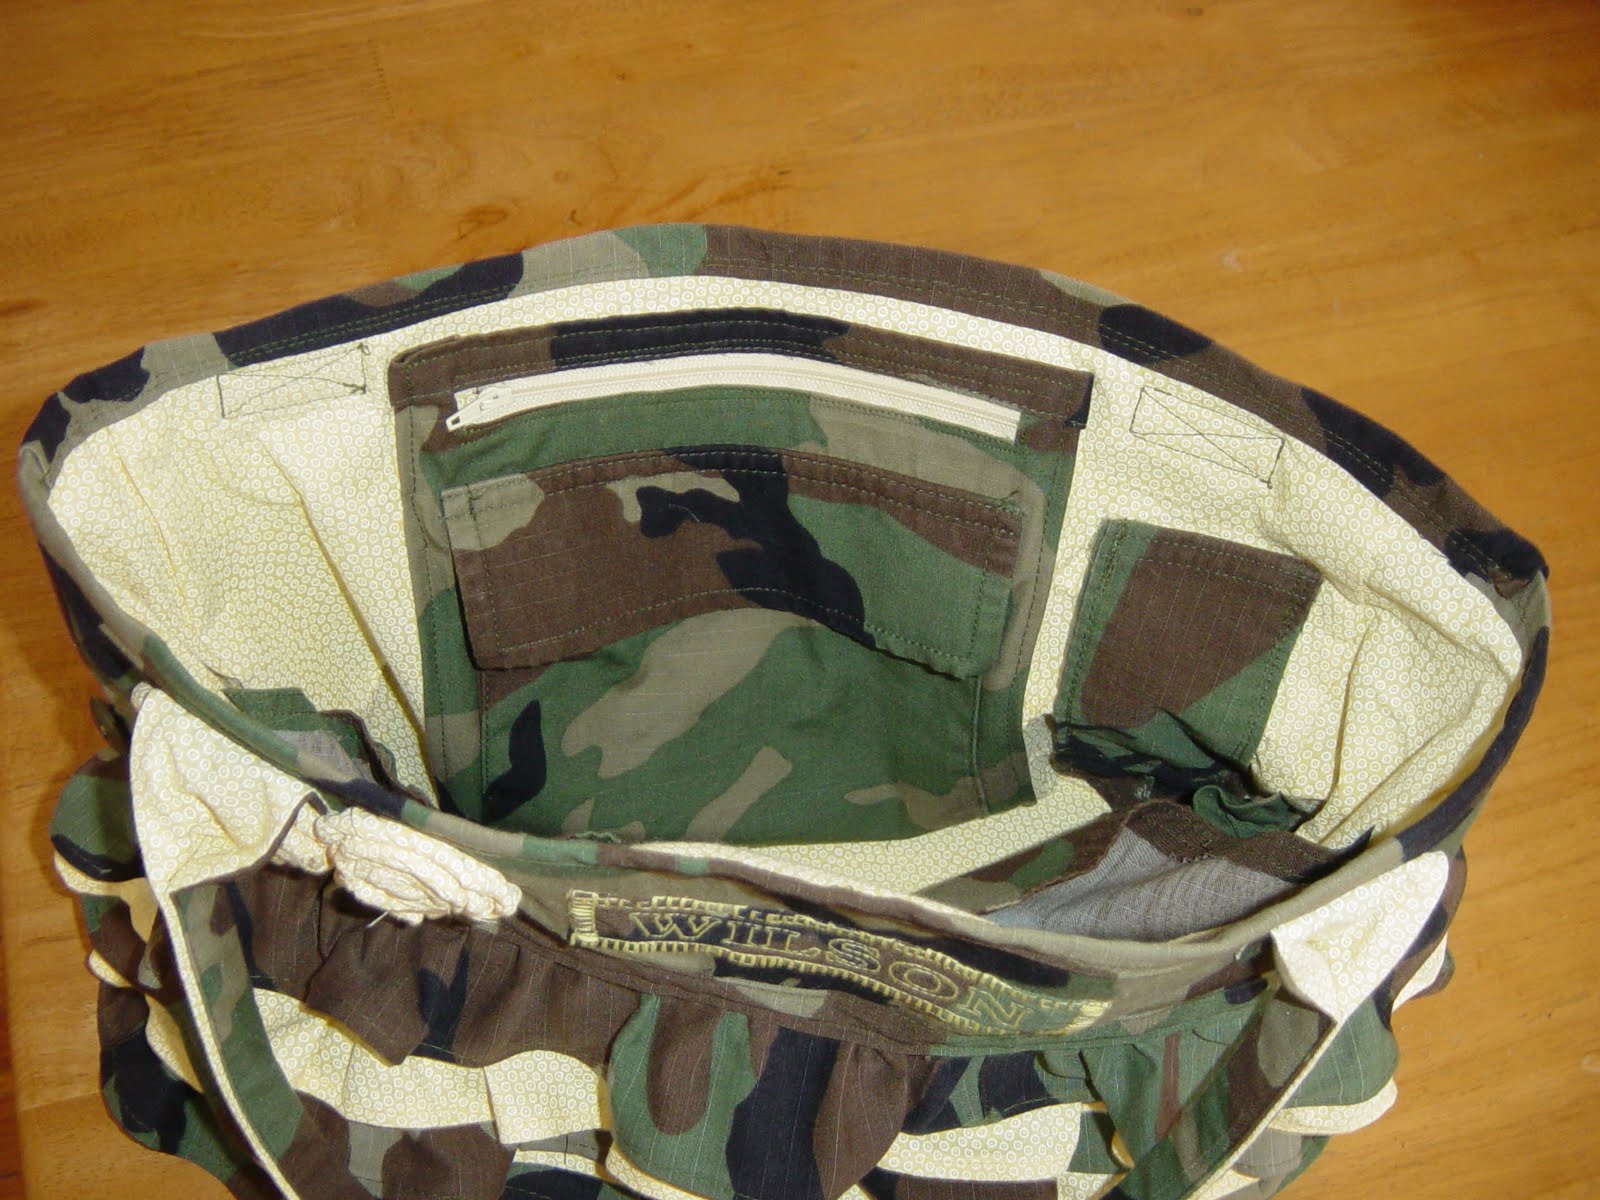
This is a really fun diaper bag, made from army uniforms!

custom lunch bag

one of 2 monkey backpacks

GIANT star crayons made from regular sized crayolas. peeled with my very own hands

A birthday gift for a berry special girl!

funky pants that accommodate clothe diapers!

Upcycled dress from t-shirt and dress shirt, with matching rolled flower headband!

upcycled pants from old sweater!

Dotty Dress

Tie Dye sister dresses w/ slight variations

upcycled ninja pants from an old t-shirt

back view of twirly skirt :)

mini Dotty Dress with matching flower head band!
~Newborn size... still available!

close up of flower skirt... uploaded by accident...
i was afraid i'd erase all the pictures, if i tried to delete just this one.

custom bandana bib & taggie order

BIBS

My lil cow girl Amelia modeling a bandana bib!

Baby wrap in girly color... i have made them in more colors than you
could imagine. This is one of my more popular items!

Baby wrap in boy'ish colors!

*******I don't believe it! How did 5 months go by, with out me updating?!?! *******
I'm gonna try my hardest to keep up with current work. This is a quick run down of things i have worked on since April.

Friday, April 8, 2011

Toddler Clothes


I'm going to play catch up really quick: The night before St. Patricks day i realized we had no green kids clothes! We were suppose to be at a playdate around 10 the next morning and i didn't feel like running out to the store(aka my husband wouldn't let me). Then i remembered i had super horrible green maternity clothes in the attic... so we chopped a skirt in half and the sleeves off of a white t-shirt. I attached the sleeves to make pants and then attached the pants to the mini skirt.... added elastic and finished one St. Patties Day out fit!


For the second green outfit, i cut a green maternity shirt in half and simply added elastic at the waist band! Since the bottom half of the shirt was used, i didnt have to hem the bottom(score!)
~I do things last minute, too often to be proud of. But then again, maybe i should be proud...because they still get done in time and look half way descent, half of the time :)


This is a dress i threw together the morning of a friends deployment party. I used vintage fabric from an old box of my great grandmothers and a t-shirt that didn't fit. I finished it with a button, and layered it over a purple shirt and pink tights. It's hard to tell, but this is actually the back view. It needs to be washed, the front is covered with the normal toddler grossness! The front has 2 pockets that reach through to each other.
~P.s> No, your computer screen isn't dirty... there is a mixture of pencil and crayon on the left side of the closet door. I will clean it up... some day.

Friday, March 25, 2011

Swap!


Sorry guys, I haven't updated in a while! Besides getting a new sewing machine...
I'm pretty excited about the swap I'm doing with Cynthia
I don't think she will be stopping by... but here is a peek at a few items I included in her package:
And if she is checking in...LOL... "sorry, the backpack does not come with a free toddler and you can't have my AAA or Aquarium pass!". I recommend finding a local crafter and doing a swap. How much fun... who doesn't love NEW things for FREE!?!? If you get lucky, you can even do a secret swap... Ahhh... i like surprises!

Monday, March 7, 2011

Quilty

yAY! I got a new sewing/embroidering machine on saturday! I haven't sewn in 3'ish weeks and i am a stay at home mom... who shares a car with her husband: Things were getting pretty lame here and my mood incredibly stale. My real job/first priority is taking care of the kids, but to be honest... they only want soo much to do with me before i become the 3rd. wheel :(
My first day back in business, I made Evee(my oldest daughter) a new quilt! I usually never have a plan... i just get excited and start sewing. I run into issues/dilemmas often, but fixing them is half the fun anyways... as long as it doesn't involve a seem ripper! Todays ISSUE: I made the ratio about 6:10... the quilt was way too narrow at first and taller than i am... so, I added a bunch of tan material to the outer edges to balance it out.
This is just the front of the quilt. I haven't decided what to do with the back. Most likely it will be all tan material with a colorful border and Evee's name embroidered in the middle.

Thursday, March 3, 2011

Annoying!

OUT OF ORDER
I have a ton of projects cut and pinned, ready to be sewn: Unfortunately, my sewing machine is being lamer than lame! I think i need a replacement part(or a replacement sewing machine with auto tension*wink*). My top thread is getting caught on bobbin case(i think)... either way, my top thread bunches in the machine after 10 stitches. Any ideas? comment below!

Waiting to be sewn together are:
  • tons of throw pillows for the girls new "giant" bed
  • a scrappy quilt
  • taggie toys in new fabrics
  • name banners
  • a wet bag for cloth diapers
  • felt diapers for baby dolls
  • baby doll pillows and blankets
Things are piling up...my dining room looks like a craft store explosion and I'm losing motivation with every day i spend trying to fix the machine. Grrr.... hope to talk to ya soon!

Monday, February 21, 2011

Baby Doll Diapers


Heres a QUICK adjustable diaper that i put together for Evee yesterday. I hand sewed 2 pieces of felt together(make a paper template first!!!) and then attached some velcro strips so it could be adjusted easily. I also cut some 5 inch squares for "wipes"... This simple diaper has kept her busy & quiet for a long time :)

Thursday, February 17, 2011

Hey Baby Hey


Little Ditti: my friend just had her 4th child!!! And guess what?!?! After months of planning/expecting a boy... She birthed her 3rd GIRL! Very big surprise but SOo exciting! Here is a onsie that i put together for her this afternoon... embellished with felt and a button! Looking forward to seeing the little cutie!

Wednesday, February 9, 2011

Upcycled toddler dresses


ISN'T SHE THE CUTEST?!?! sorry, just saying :)

Did you ever have a t-shirt that you just couldn't get rid of? Even though you knew it would NEVER fit again, had built in deodorant that couldn't be washed out and would never come back in style. Well some of you may have already realized, but for those of you who haven't: toddlers can pull off any style... even MORE so when they have red hair! Today I tried to make dresses for the girls. I think there is definitely room for improvement, but over all it was not a total failure... and most importantly it was fun. Todays materials consisted of a 10 year old fishy favorite(purchased at tj maxx) and a tie dye shirt(handed down from my mom) that is probably closer to 15 years old. I have been in denial for 5 years, as far as the koi shirt goes.... it was way to tight and short after the 2nd wash...but it was my favorite! The tye die shirt has awesome colors that haven't faded since the day I inherited it... but the fit is horrible. I thought it was too cool too get rid of, though I packed it away(for salvation army) half a dozen times.


15 year old tie dyed T-shirt...thanks MoM!


I started by tracing a store bought dress... and then forgot about taking
pictures of the other steps...LOL...so you are on your own!

Always snacking!

I'm pleased with todays out come... but look forward to cutting up more clothes!

Friday, February 4, 2011

DIY Diaper inserts

Two days ago, I started using cloth diapers. I bought them months ago from http://www.fuzzibunzseconds.net/store/Default.asp, with big hopes to save money every month. However, I had a weird feeling when they came in.... It felt kinda wrong letting my baby poop on a $12 pair of underwear. I also had a slight fear of what the first poopie diaper would be like. Any ways, the first night in a fuzzibunz diaper, Amelia peed her entire bed...TWICE! I was in disbelief, after all, I knew soo many people that used and loved cloth! Why wasn't it working for me?!?! After a quick consult from my cousin Julie, I learned that more layers were needed. That was all...LOL... just a few more layers to absorb. Why didn't I think of that?!

I looked at a ton of websites for diaper doublers and I was petrified by the prices! I currently have 10 cloth diapers, but I wasn't sure how much money I wanted to put into diaper liners. I did a little research and realized all the supplies could be found around the house or bought for a few bucks. SOo i decided to make my own! I got five 2pks of wash cloths and 6 microfiber hand towels for 11 bucks and some change. I was able to make 12 diaper doublers and have left over supples. Heres what you'll need to do:

Wash your fabrics
cut 6 washcloths and 6 microfiber hand towels in half
sandwiched a piece of washcloth between a cut of the microfiber
& then zig zag around the outer edges 2 times.
Once you snip the loose strings and frayed terry, your doublers are ready to be used!


You can use more layers if you want or switch up the materials used(swap for flannel, cotton, fleece, hemp or wool). You can also add rounded corners for a store bought look(but I don't think your baby will care). If you have pocket diapers, these will work great! If the liners you are making, will be touching the babies skin: you are going to want to add a layer of flannel or fleece to the out sides. I have read many places, that putting micro fiber directly on your babies skin, will dry them out! Two days in, I am completely happy with cloth diapering and wish I would have gave it a shot much earlier. In case you were wondering, the first poopie diaper was incredibly EASY! The pads draw all the moisture away from your baby, so when you flip your diaper upside down over toilet, the poop falls right off(even the squishy yucko poops). I would highly recommend using pocket diapers for potty training... they are much easier then having to scrape poopy underwear! Thank you to all my friends & family that have supported us during our switch! All your advice and encouragement has been much appreciated! Have good day folks and as always, Happy Crafting :)

Tuesday, February 1, 2011

Jean Fix


Some times people are given things in life. If you are like me, you weren't given height or money :) I am short... filthy bottom,torn jeans are the story of my life(on top of diaper changing and laundry). Last week(while wearing my favorite jeans) at my sisters, I went to stand up and heard my pants make the saddest noise :( when I looked down, they were torn all the way up to my calve. Most people would say toss'em and buy a new pair... but since my full time position doesn't pay with cash... I will make them last a little longer. Today, I wanted to share how easy it is to fix your favorite jeans! I know it's fashionable these days, to sport holes in your jeans and leggings... BUT, I live in WNY & it gets cold here!
SOo...fixing jeans 101... for people that have access to sewing machines:
~find a patch... this can be an old piece of scrap fabric or a store bought patch
~pin it to the inner side of your jeans
~I usually start by doing a straight stitched square around the patch
~remove the pins
~you can go the strictly functional route or attempt to copy cat the sloppy patchwork that is also in these days. Heres where I turn the zig zag function on and just go back and forth in every direction
This quick guide may not win you any fashion shows, but it will fix you holey jeans and keep your legs a little bit warmer. But then again, it might win you a fashion show.